Black screen
For Windows 7, you need to set your custom performance options for the duration of remote desktop operation:
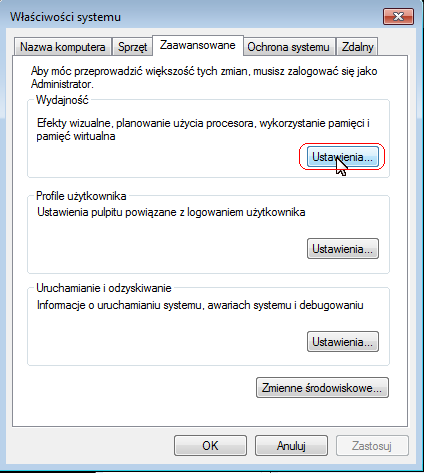
In "My Computer", right-click and select "Properties".
Select the "Advanced system settings" link on the left hand side

Under the "Advanced" tab, click the "Settings" button (in the "Visual Effects....." section)
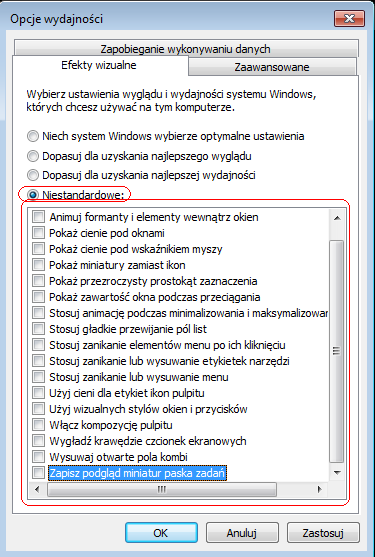
In the "Visual Effects" tab, select the "Custom" options and deselect all options in the list below
Approve the amendments.
Before the end of the session you have to restore the previous settings, so it is worthwhile to look at the current one before any changes in the configuration.
You will be able to block the view with the DFMirage screen driver and the window layer capturing option turned off.
Select the settings icon in the remote connection window, as shown in the picture below:
Then uncheck the 'Capture window layers' option and select Default image encoder (GDI).
In Windows 8, this option only works from the metro interface, but may not work when the desktop is open. The problems described above are caused by the lack of development and fading support for these technologies by MS.
iAMT/vPro technology
The IT Manager system from version 5.3.x onwards has the ability to manage computers with iAMT/vPro technology.
iAMT allows administrators to fully manage the computer remotely, even when it is switched off. The only condition is that the computer is connected to the power supply and computer network. The management of a disabled computer is based on reading the hardware parameters of the computer and remote computer start-up.
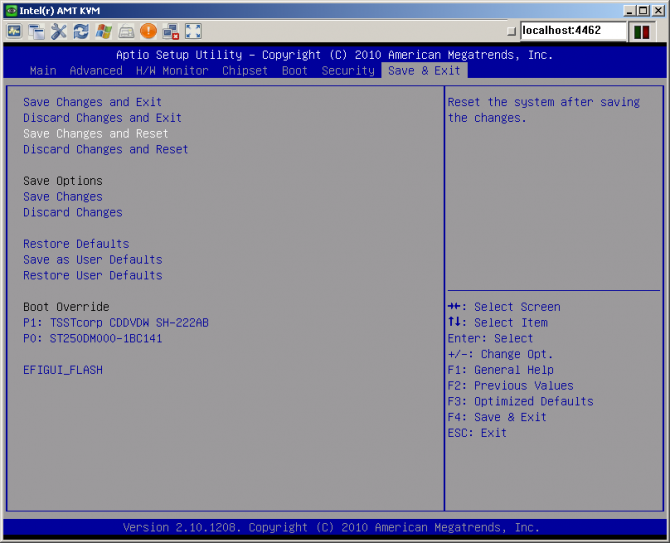
The computer can be remotely switched on, off, reset and enter the BIOS settings. Thanks to the SOL (Serial Over Lan) function, the administrator can intercept the computer's text console and keyboard, which can be used e.g. to enter the computer's BIOS.
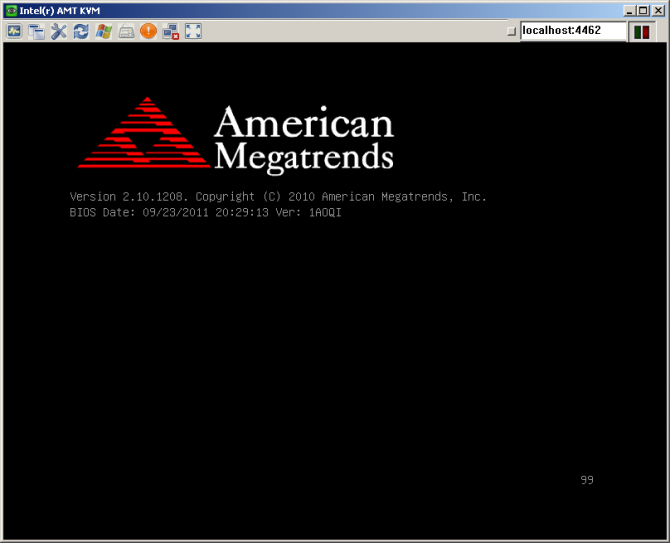
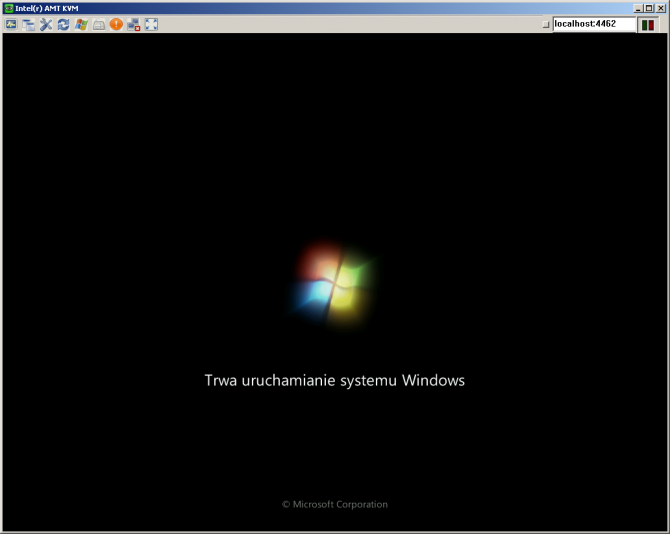
A new feature is the KVM Remote Control (hardware KVM) function, which enables full capture of the computer screen, starting from the computer's initiation screen, BIOS, loading the operating system, as well as full keyboard, mouse and screen operation in the operating system. The function is independent of the operating system, so it provides engineers with a powerful support tool. KVM works even if the operating system crashes, it crashes.
The functionality called IDE-R allows you to start your computer by starting from a remote ISO/IMG image, which allows service technicians to run a repair program, install remotely the operating system whose image is on the service technician's computer.
Technology availability scan
The agent from version 5.3.1582 performs a hardware scan of iAMT/vPro technology with information about the current configuration. In the job list, the column "AMT status" indicates the current state of AMT on the computer. Four different values can be displayed:
- No - the computer supports the technology, but iAMT is not configured,
- Conf - iAMT state when the configuration has started but not finished,
- Yes - iAMT is configured on the computer,
- None - the computer does not support iAMT/vPro technology.
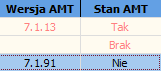
An empty field suggests that a hardware scan with agent 5.3 has not yet been performed. If the technology is present on the computer, the iAMT firmware Management Engine iAMT version is displayed in the column "AMT version".
By right-clicking on the workstation and expanding "Management by Intel AMT", a list of available iAMT functions opens.
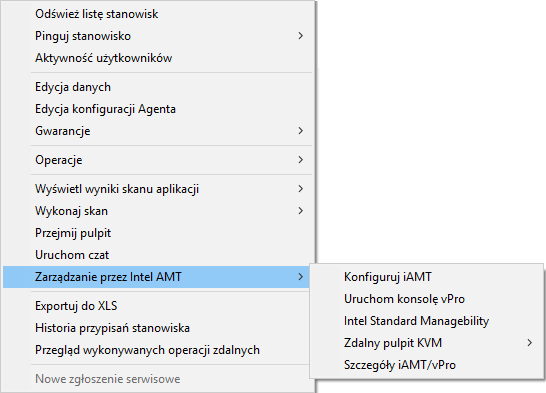
Under the option "iAMT/vPro Details", details of the iAMT/vPro scan are available. The data is presented in three tabs:
Basic - basic information about the computer, operating system, date of scan
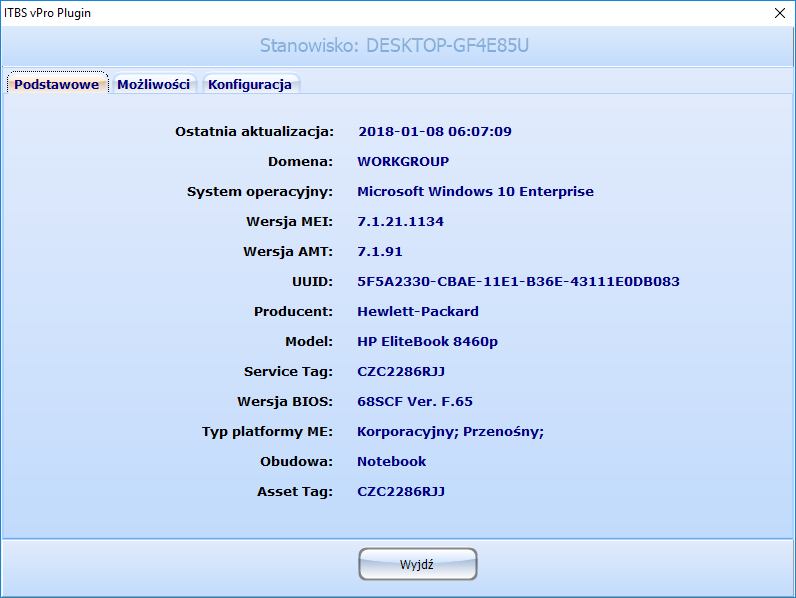
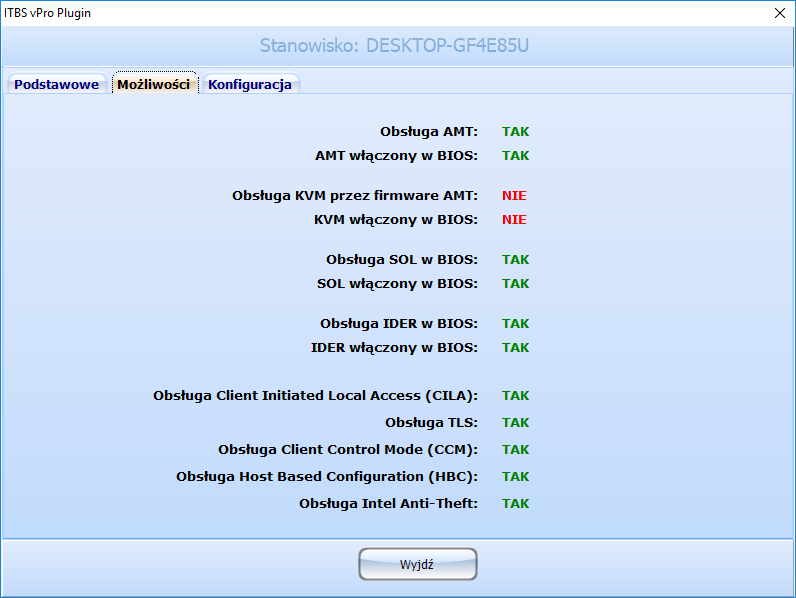
Capacities - information on available functions of vPro technology
Configuration - current computer configuration for vPro technology

iAMT configuration
The computer with iAMT can be configured in several ways, of which two categories can be distinguished according to the firmware version:
1 Host Based Provisioning (from Intel AMT 7.0 onwards)
- Client Control Configuration Mode (CCM)
- Admin Control Configuration Mode (ACM) Legacy Mode (computers with Intel AMT lower than 7.0)
The first category is also divided into two methods (CCM and ACM). The IT Manager only supports the first configuration method, CCM. To configure iAMT with a different method, configuration must be done with Intel tools or manually. A description of the configuration can be found in the iAMT documentation: http://communities.intel.com/docs/DOC-1550.
Client Control Configuration Mode in IT Manager
The method allows for non-contact configuration of the computer, which is performed by means of an IT Manager agent. This is the only method that you can configure your computer with iAMT without using a configuration server or certificate server.
For remote configuration, select Configure iAMT from the workstation menu.
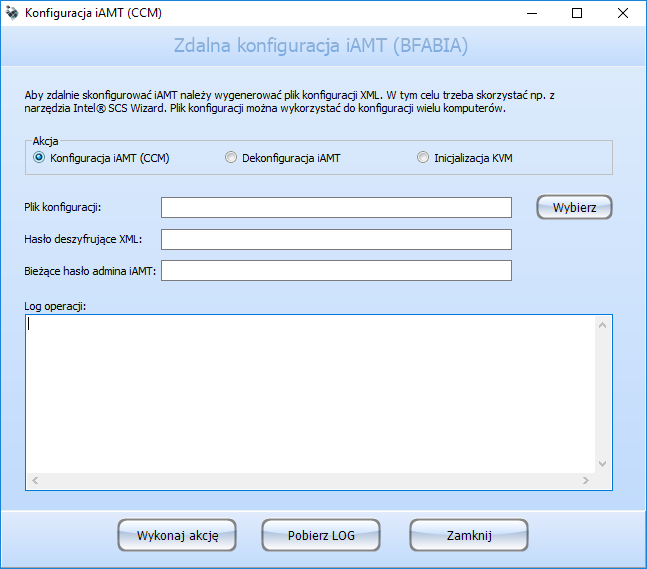
Enter the XML configuration file in the first field, which you need to create using the ACU Wizard, which is included in the Intel Setup and Configuration Software (SCS), downloadable from http://downloadcenter.intel.com/Detail_Desc.aspx?agr=Y&DwnldID=20921 (approx. 45MB, without installation).
In the second field, enter the password for the generated XML profile. Each XML profile created by ACU Wizard is encrypted and only the correct password can be read.
The third field is required when the computer is already configured and the current administrator password is different from that defined in the XML profile.
In case of iAMT deconfiguration, only the administrator password must be entered.
The "Perform action" button sends the requested action to the IT Manager agent. The third option - KVM initialization is performed agentless with PowerShell and WinRM. WinRM configuration is required, as described in the next chapter. KVM initialisation is necessary after each iAMT configuration if this technology is used.
WinRM configuration under iAMT/vPro
For the IT Manager console to have full iAMT/vPro functionality, WinRM must be configured on the administrator station. PowerShell 2.0 and WinRM 2.0 should be installed by default in Windows from version 7. On computers with Windows XP it should be installed with optional updates (KB968930).
Then configure WinRM by entering the following command line:
- winrm set winrm/config/client @{AllowUnencrypted="true"}
- winrm set winrm/config/client @{TrustedHosts="*"}
- winrm set winrm/config/client/Auth @{Digest="true"}
The first command causes WinRM to be able to connect to iAMT after the http port (another configuration method is required for https - using certificates). The second command allows you to connect to all hosts (you can limit it by giving host names or IP addresses separated by a comma instead of an asterisk). The third command allows authentication using the Digest method.
vPro console in IT Manager
The vPro console requires installation of the Intel vPro Technology Module for Windows Powershell: http://communities.intel.com/docs/DOC-4800.
By selecting the "Run vPro console" function, the PowerShell console opens, using the basic commands of the vPro technology.
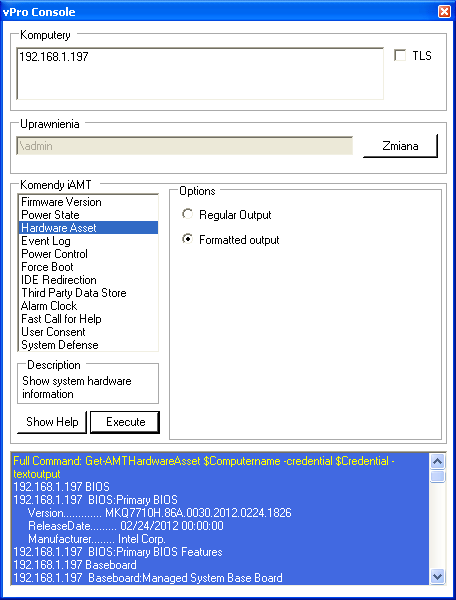
First, you must transfer the relevant iAMT privileges by clicking on the "Change" button, then you can execute the commands:
- Firmware Version - displays the Intel AMT firmware version,
- Power State - current power status of the computer (from S0 to S5):
- S0 - fully on,
- S1 - dormant in the context of the processor and components,
- S2 - dormant with total processor shutdown,
- S3 - dormant excluding all components, but with RAM refreshing,
- S4 - hibernated,
- S5 - off.
- Hardware Asset - displaying hardware information (BIOS, motherboard, CPU, RAM).
- Event Log - displaying AMT event log.
- Power Control - turn on, off, reset the computer,
- Force Boot - switching on or resetting the computer with start parameters:
- BIOS - input to BIOS
- PXE - boot from the net,
- IDER - computer start from the image of the disc or the .iso floppy disk, which is located on the administrator computer (IDE Redirection technology),
- HD - boot from hard drive,
- CD/Optical - boot from an optical drive
- Use SOL - additional redirection of the text console to the administrator's computer (displaying the text console e.g. in the PuTTy program). The option is currently used less and less frequently - it is replaced by KVM technology.
- IDE Redirection - computer start from the redirected disc image (see point IDER). Possibility to display and stop active IDER sessions.
- Third Party Data Store - possibility of saving additional information in a chipset (e.g. inventory number).
- Alarm Clock - possibility to turn on or off the computer at a certain time, day, with periodicity setting.
- Fast Call for Help - a technique that allows you to connect to the target computer via HTTP Proxy or SOCKS Proxy,
- User Consent - certain functions (e.g. KVM for CCM configuration) may require the consent of the computer user. This function can be used to send a request for user consent. The computer screen will show that the technician wants permission and a six-digit consent code, which must be given to the technician. Enter this code in the PowerShell console window (black background window). The code is valid for a certain time. Starting the KVM console can also show this window to the user.
- System Defense - a technology that allows blocking the movement of e.g. computer worms and informing the administrator about the problem (currently not supported by the IT Manager).
Remote KVM desktop in IT Manager
After selecting the option Remote KVM desktop, the VNC Viewer window should open and the connection to the target computer should be established. If AMT was configured using the CCM method, you will be prompted to enter the six-digit user consent code.
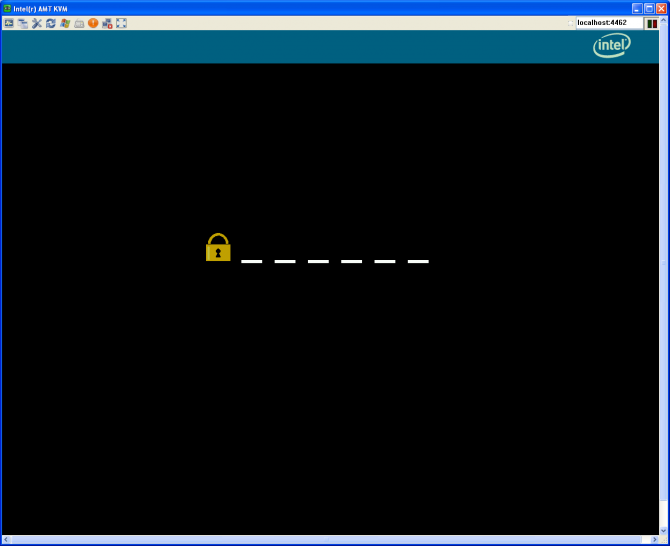
Entering the correct six-digit code will display the dashboard. The KVM is independent of the operating system on. You can restart your computer, enter the BIOS, install the operating system from a redirected CD image, etc. without any problems.
In order for the IT Manager to properly connect to the target computer, you need to enter the AMT administrator password for the agent configuration (globally if all computers have the same password, or for a single job, excluding inheritance).
Below are 3 screenshots taken during the iAMT KVM connection: